Tuesday, June 17, 2014

CC#3C Layering Stencil Texture Paste

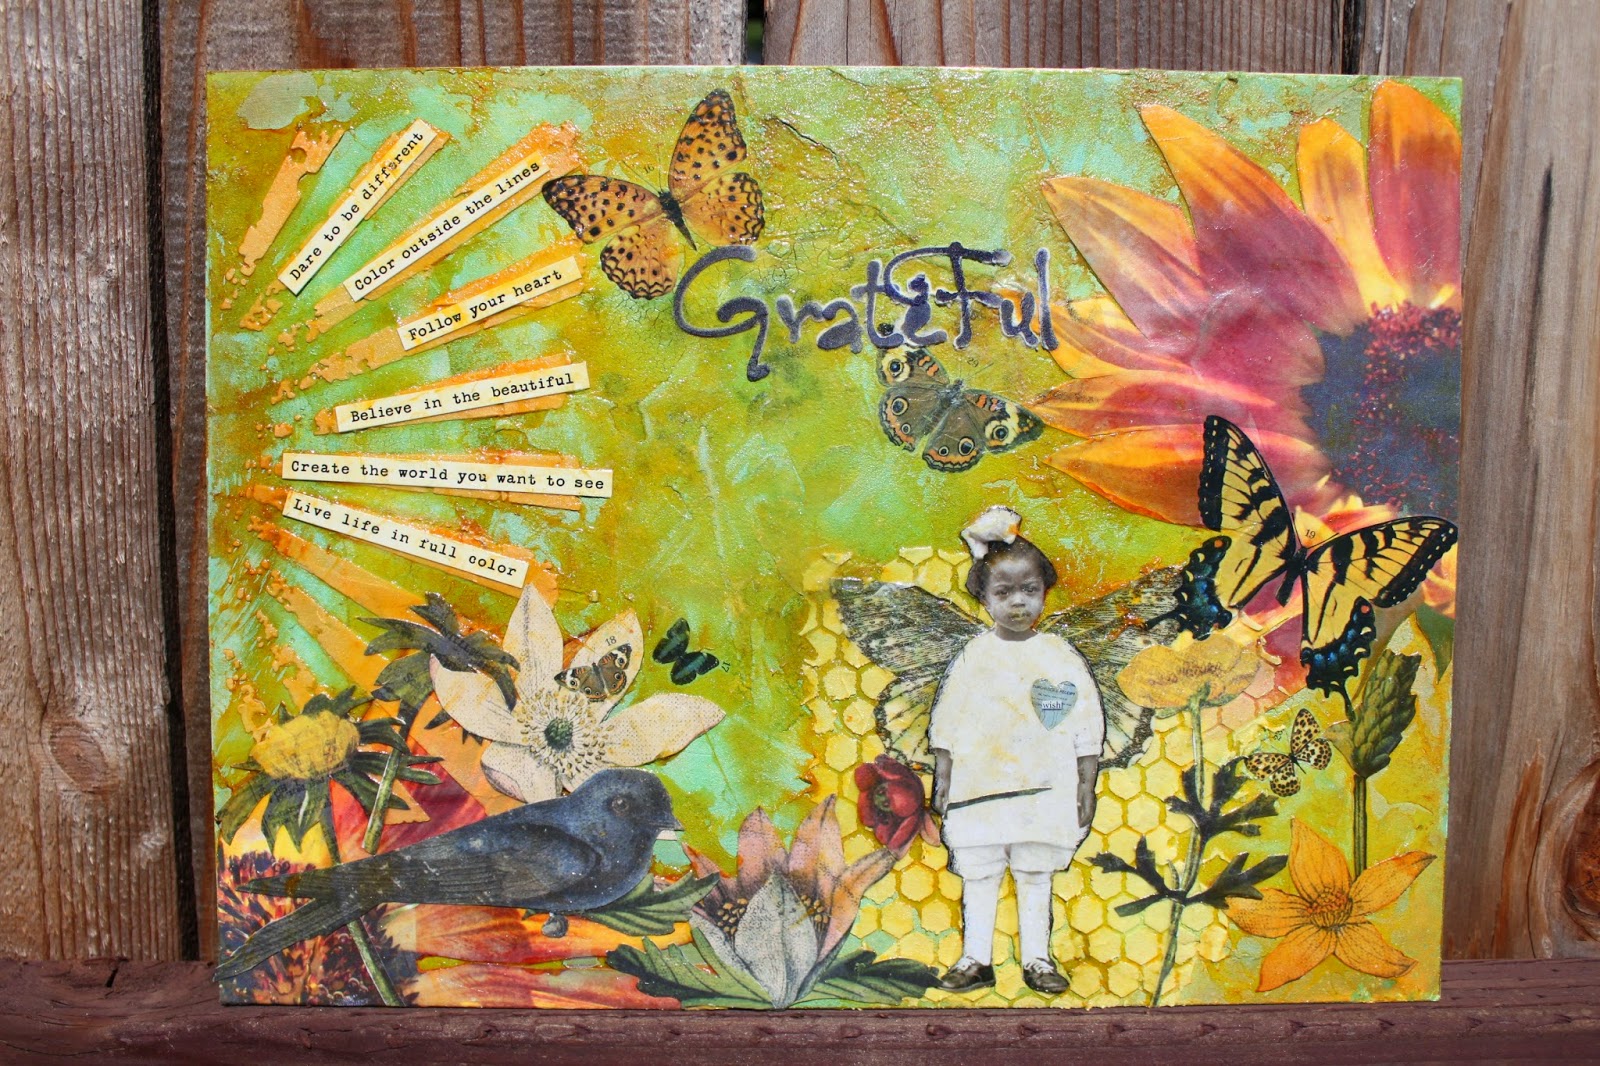
Wow, here we are entering phase four of the CC#3Challenge: Layering Stencil
Texture Paste on page 49 of Tim's Book Curoisity of Compodiums #3. This books rock
so if you don't own it yet you can still purchase directly from Tim or Instant Emporium
or the lovely Funkie Junkie Boutique. The Funkie Junkie Boutique sponsors this
current challenge. All of the ladies on the CC Crew make great pieces for this
challenge as well.

Everyone rocked the last challenge with great diversified enteries. I wanted to do
something outside of the box that would give me some room to play and create.
I used a flat paint board I had on hand that measure 12 x 9 inches. I used Wendy
Vecchi's embossing paste on the background for texture. I used Tim Holtz Stencils,
Wendy Vecchi Embossing Paste, a Variation of colored Sprays to acheive the
background effects. I used the following Distress Inks by Tim Holtz: Mustard
Seed, Tea Dye, Spiced Marmalade, & Vintage Photo. I also used Distressed
Stains that were mixed into my embossing paste on the Sun Stencil, and Honeycomb
Stencil. I used Spiced Marmalade, & Wild Honey by Tim Holtz.  I also used
some Distress Crackle.

For my background I used Tattered Angel, Two by Recollections & Color Bloom
by Prima. I also used Two Adirondack sprays on the background.
I used layering Stencils effects, and Embossing Stencils effects. I used Sunflowers in the
background I had photographed over the previous summer. I cut them out to
add color. The flowers and bird in the background is from Tim Holtz Wallflowers
Papers. The little girl is from Found Relatives by Tim Holtz. The words that
create the verse in the Sun Rays are Tiny Text by Cosmo Cricket. The Butterflys
are rub ons from 7Gypsies. Tim Holtz Tissue Wrap Melange.

To cover the images and background I used Wendy Vecchi's Translucent Embossing
Paste.

http://lindaledbetter.com/2014/06/compendium-of-curiosities-3-challenge-4.html


In the final note of this piece I had intended to add the word: Grateful, I embossed
each individual letter and used black archival ink to color over.


Thank you for taking a peek!
Happy Trails,

Jan


Wednesday, June 4, 2014

Jan Bianchi Faux Roses CC#3C

Wow, here we are already into the #3rd challenge for the Compodium
Curiosity Challenges hosted by the lovely Linda Ledbetter and the #CC Crew. 
This challenge is on Faux Roses which can be found on page 65 of Tim's new
book A Compendium of Curiosities Volume III. This challenge is also being
sponsored by the Inspiration Emporium. And there will be a generous gift
for the winner from Tim and Mario.

I used a Tim Holtz Clock which I altered. I used Dina Wakely's Gesso.
Recollections Spray Ink Yellow Shimmer & Heidi Swapp Color Shine Mustard,
and Gold. I used a sheet of Once Upon A Time paper I had from Graphic 45.
The small lamp inside is from Tim Holtz Mini Lamp.
I used Once Upon a Springtime by G45 that I had been saving.
I had cut the rabbit figures, fairies, and small figure about the top of clock.
I burnt the edges on the small posting that reads, Once Upon a Springtime. 
The face of the clock on the backing I download as a freebie.
I added green moss to the bottom of the inside of the clock.
I used Kraft-Core Shattered Collection papers for my roses and foliage.
I also used Crinoline for the added layer on the foliage to add dimension.
They were colored with a variation of Tim Holtz Distress Paints.
Rangers Embossing Antiquities Frosted Crystal with Distress Stickles Dry Glitter
was also used on the roses.
I used Black Soot Distress Paint of the edges of the Bunnies and Fairies.
Sand Paper, and Dina Wakely's Crackle Texture Paste.
And of course I used the Tattered Pinecone Die Cut from Tim Holtz
for my roses. Have to say, I loved making them.
The little blue bird emblellish and butterfly I had.
The theme was for a fun whimscal feel to the piece.
Matte Modge Podge.

Enjoy the Journey!

Jan

Saturday, May 17, 2014

Compendium of Curiosities 3 Challenge #2 Distress Glitter.


I have to say I am really enjoying the process of the individual
challenges. So here we are on Challenge #2 Distress Glitter!!
I love this glitter! It isn't hard to work with and what beautiful
colors and contrasts to play with. The lovely Linda Couglin and the Funkie
Junkie Boutique is sponsoring all the even number challenges with a $25 gift certificate.
A big thank you to Linda Ledbetter again and the Curiosity Crew of Ladies!

I loved that I could stack the smaller framing around the larger
and the fact they complimented each other. I used my mom's high school graduation
photo for this piece. I used a piece of clear masking plastic from Tim Holtz
to act as a covering for her photo.

I used Vintage Photo Distress Ink on the backing of the larger wood framing.
On the smaller frame I used Antique Linen. I furthered distressed the background
frame with Black Soot Distress Ink around the edges. I lightly coated the
background wood with varnish. For the frame I used Antique Linen Distress Ink
on the wood, and then used Antique Distress Glitter. I went over the Antique Glitter
with Vintage Photo Distress and Black Soot.

My mother loves the ocean. So I went with Sand & Sea by Sizzix Alterations.
I used Pumice Stone Distress Ink & Pumice Glitter on the Sea Horse.
The little wood heart I used Festive Berry Distress Ink & Festive Berry Distress
Glitter. I used Black Soot on the edges. The Starfish I used Spun Sugar Distress Ink
& Distress Glitter. I went around the edges with Pumice Stone Distress Ink.
The Metal Heart afixed at the top of the frame is from Prima Vintage Trinkets.
The ribbon is a special ribbon I bought here locally sometime ago.
I used wording I had that reads: I love you. I used a small piece of Distress Paper,
used Antique Linen Distress Ink lightly over it and covered
it with Glossy Accents. I accentuated the wording with a small brass framing.

Here are the links to the current challenge & FunkieJunkieBoutique.

http://lindaledbetter.com/2014/05/cc3challenge02.html

http://www.thefunkiejunkie.com/


Thank you for stopping by!!! Enjoy the Journey.

Jan

Tuesday, April 29, 2014

For CC#3 Challenge #1 Paint Marbling

Here goes: 
Thank you to the Inspiration Emporium for offering a $50 dollar 
Gift Certificate for the first CC#3 Challenge.  
They are sponsoring challenge #1, and all the odd
number challenges as well. One can also use the code CC3C for 
a 10% discount at the store for the duration of this challenge.
The compendium of Curiosities #3 Challenge is sponsored by The Funkie
Junkie Boutique, and the Inspiration Emporium. I can personally say both of 
these shops are awesome to purchase from. Having purchased from both
myself they provide the upmost care in service!  A big thank you to 
Tim and Mario for all their goodies as well!!

I have to say when I started my project for the Paint Marbling 
didn't have a clear idea or how it was going to turn out other than I 
started with a small vision of the little boat at sea. The twosome in 
the boat is my Grandmother and Father.  This was taken 
up at Lake Co. near Forest Lake back in the day.  I did four separate 
sheets of the the chosen colors I used for background onto Ranger Watercolour 
card stock.  I did cut individual pieces to border the inside of the small framing 
to keep with the theme and to show the marbling effect I achieved. 
The wave is made from the water color paper I used the marbling technique on.
I used the sun stencil by Tim Holtz for background behind the chosen picture.
I took the canvas off a Tim Holtz Canvas and simply used the wood for my framing.

The border is done in Alcohol inks to match the inside.
I used the new Tim Holtz Ideaology Frame and Star Trim.
I used the Shells and Starfish from Graphic 45 By the Sea Paper.
The little embellishments hanging on the pic are from Tim Holtz.
As well as the little metal wings on the backs of my figures.
The stars are from Tim Holtz.
The little pearl beads I dipped in Mushroom Alcohol ink.
The rub ons are also Tim Holtz on the background.
The word Authentic Tim Holtz.
And the corner angles are from Tim Holtz Ideology line.
I used four different Distress Paints to achieve the background 
for the marbling effect. 

Thank you to Linda Ledbetter for sponsoring the CC#3 challenges, 
and the wonderful team of ladies on the CC#3 Crew.
http://lindaledbetter.com/2014/04/cc3c01.html


Wednesday, April 23, 2014

Varsity Man

When I started this project several weeks ago if not longer,
I had a certain idea in mind. Then I changed it up realizing
what I first envisioned wasn't going to work as well as I thought.
The little shadowbox was a candy box I received on Valentines Day.
The first thing I did with the box was sand it down inside,
and the outside edges.

I placed corragated cardboard in the background as the initial
layer. I also distressed with Vintage Photo Distress pad.
I also added Gesso in ever so lightly.
I added Red Barn Distress around the inside edges.
I also Gessoed the inside edges then I sanded them.
There are two playing cards on top of the corragated cardboard.
Then I added an ephemera piece from Tim Holtz latest releases
layered to the left side, and the a clock piece on the right.
The UpperClassmen figures for Football, and YellLeader
are from Graphic 45. My Harvard Preppy Man is from
my Grandmothers old photos.

I used Tim Holtz Letterpress Letters to spell out Varsity.
I sanded the small individual blocks,
then I used a waterbase varnish and varnished them.
The Lemon-Lime Soda cap I had. The small clip from TM,
and the small stars I colored with Mushroom Alcohol ink.
The small banner piece I cut out and added the numbers 56.
I also used an adornment from Tims Nature Adornments.
I added a small silver ballglove and key to the red/white string
from Tim Holtz also.

For The VSC Challenge Anything Goes:  http://www.flonzcraft.com/vsc/?p=1410


Wednesday, April 9, 2014

Heart Song Shadow Box Photo Holder


I started out with a small wooden shadow box that 7Gypsies sells.
It came in a white distressed form.
The measurements are roughly 6 x 6.
I had taken the Adirondack Acrylic Paint Dabber Silver (Metallic) around
the edges during Christmas thinking I would make something out of it then.
This obviously did not happen. So to keep it interesting I added the color Pool,
Then Snow Cap around the edges and along the front.
I then added as an overlay Pool back in which is close to the newly released Peacock.
I would later sand down the edges to distress the actual look for a more retro affect.
In all it left a marbling look to the colors.

I used Tim Holtzs new Wallflower papers for the background
In each individual box. The actual color of Pool somehow ebbed and flowed
In the drying process and left the look of an accent to the edges.
I added Tim Holtz corners for further embellishment.
I gessosed the back of the shadowbox,
Later adding a piece of the wallflower paper,
Which I modpodged to give added protection to the paper itself.

For embellishments I added a small wooden birds nests with eggs.
I used the color cordury in the acrylic dabbers by Tim Holtz on the nest.
I used Tims latest metal embellishments a rose which I colored with alcohol inks.
I used some white resins eggs from Prima, Shabby Chic Treasures.
Along with the Letter B from Tim Holtz line: Letterpress Typographie.
The tree branch with the tiny bluebird I colored with Peacock, and added 2 small gems.

Main area of the shadowbox I used a clipboard clip from Tims new line.
I distressed it in Peacock and then sanded over the surface to distress it.
The small framing around the little boy is from Tim Holtz.
I used simple paper tape with the stamped lettering, "i love you," from Tim Holtz.
The paper heart added for measure.
I also added the feather from my own collection.
There is a small bird on the clipboard piece I colored in Peacock to add
some character.
The small pin has a tiny heart hanging from it that reads, Heart Song.
Both from Ideaology line by Tim Holtz.
Found Objects-from Tim Holtz.
The Monocle and Chain-Tim Holtz.
The picture of the little boy is a vintage photo.

This is being submitted for the latest VSC Challenge: http://www.flonzcraft.com/vsc
Anything Goes.

And for http://frillyandfunkie.blogspot.com challenge Flights of Fancy

http://blog.inspirationemporium.com/?p=2192 For Anything Goes Challenge

We will always take a thousand steps towards that moment in time where something spectacular happens! And then we begin again! With so many more moments awaiting us!. JB

Enjoy the Journey,
thanks for stopping by!

Jan

Thursday, February 27, 2014

Getting Back in the Creative Saddle.


I have my favorite blogs I like to follow and savour the designs
from so many great individual artist. I study the way they piece
affects together and the dimensions of their thoughts when applied
to the medium of their choice.  I also find getting back in the saddle to
my own personal fashion of creating is often frought with the need
for time and the space to evolve my ideas. Yes, my craft supplies
are all over the house but neatly tucked into their niches. Is my boyfriend
always happy about that no! But I try to balance the lack of space
with the idea that we are going to expand my need for a studio out
into the garage eventually! Once his corvette sells.

I love all things vintage and love to rummage through thrift stores
looking for elements that piece fabrics of history into the now.
I love the treasures of old family photos and my Italian history
from my hometown in its early days. I find creating always pulls
me into a fuller and better place amongst the stresses of my days.
Like anyone who is working at developing their name and craft
it all takes time and hardwork. So if your ever feeling torn don't
give up your dream or your ambition. Everything has its hours
and day.

Enjoy the Journey!
Jan


Wednesday, February 26, 2014

For Vintage Stamping Challenge: Challenge #17 - It's A Man Thing'

Won Highly Desirable:
Vintage Stamping </p><p><br></p><p>For Vintage Stamping Challenge: Challenge #17 - It's A Man Thing.</p><p><br></p><p>It has been awhile since I posted but this piece is for:</p><p>For Vintage Stamping Challenge: Challenge #17 - It's A Man Thing.</p><p><br></p><p>I used a photo of my Great Grandfather. The stamp I used was from Tim Holtz Words:</p><p>Enjoy the Journey stamped on a Tim Holtz Ticket.</p><p><br></p><p class=


I had a small clipboard that I had collage in Seven Gypsie Paris paper.
I went around the edges of the clipboard with Black Soot Dabber.
I have a piece of Vintage Script Paper for the initial bottom layer.
This piece has altogether has four layers.

I used a piece of Marion Smiths Garment District paper for the bottom layer.
Then I took a piece of corragated cardboard and distressed it with Gesso
Along the edges.
I added a small playing card behind my Great Grandfathers Picture and distressed
The edges with Vintage Photo Distress ink pad.
I took a rub on to the left side of the picture and applied the look
Of stitching to the left.

The key is from Tim Holtz and reads, Dream
My Great Grandfathers photo is printed out on Matte Photo Paper.
I sewed the border around the picture in black thread.
The brad on the picture reads, Journey.
I distressed the clipboard clip in Alcohol Inks: SnowCap & Stream.
Then I added the crown also from Tim Holtz.
The metal flower I distressed with Alcohol Inks as well,
And turned up the edges. I added a small piece of jute string.
The ticket is from Tim Holtz, and the hat I cut out
From Marion Smith paper. There is also a small beige stitch
on the ticket.

I added a Tim Holtz tiny gear.
And jute ribbon across the bottom of the picture.
The four corners pieces are decorated from 7gypsies.
I distressed them with Gesso.
The number 5 clip is random.
I added a small time piece for the time period.
I also added a small rusted heart and safety pin to the piece for rustic affect.

Thank you for stopping by!
Enjoy the journey!

Jan

Saturday, February 1, 2014

Savoring the Moments...


Scrapbooking/mixed media is about savoring the moments. Or better yet perserving the moments. Honoring the quality of the past for future generations. It seems so much of the simplicity of times gone by has become so buried beneath the age of technology. We literally swirl through the days and nights heeding to a schedule with eyes half closed and hearts half full. When I started this post it was in late December and now here it is the first day of Febuary.  I felt really burnt out on everything related to creating after doing so much prep work for a Holiday Craft show I participated in prior to Christmas.  It wasn't until today that I actually did some work mix media work to try and get myself connected a bit to the process and inklings that are stirring within. It is easy for the demands of the day, family to take over.


I made this piece with an old photo of my grandmother sitting in the far left corner in the rear with the stocking cap on as a piece for the craft fair, but then my mom saw it and I gave it to my dad. This picture was taken up in Tahoe obviously during the forties. I put Tim Holtz frosty film over it and it made the period even more inviting for this picture.  The star was a tin star I had boughten in a close out sale and I ended up using alcohol inks on it to give it some color and splash.  I painted the background with a candy apple red spray paint. They eye glass is from Seven Gypsies.